
As promised, this is the first of two blog posts about creating a dedicated, distraction-minimizing device for writing, with a focus on composing. I’ll start with the idea that I think is the most accessible to everyone. I call it the “Writebox.” The second post will look at a more quirky, fun, “hobbyist-oriented” solution that might appeal to retro-computing geeks like myself.
Why Dedicate a Machine to the Single Task of Composing?

Back when I was teaching writing courses to undergraduates, I would sometimes start the conversation about the writing process by showing a clip from the original Star Trek, where Captain Kirk defeats an artificially intelligent computer (turned to eeevil) by making it compute some kind of impossible paradox. The computer would, of course, confuse itself, its very speech and syntax would start to break down, and, of course, the prop computer would start to sputter, spark, blow fuses, and smoke like a house on fire. “That’s what happens to your brain,” I’d say, “when you try to do all the tasks involved in creating a piece of writing all at once.” Then we’d have a discussion where we’d start by listing all of the things one needs to think about in the process of creating a finished piece, from one’s knowledge of the subject to matters of structure, grammar, and style, to processes like revision and editing, to the technical matters of formatting and documentation. When we’d filled the blackboard with all those things, it was no wonder that trying to think about all of them at once would easily fry one’s brain and result in very stilted efforts, if not flat-out paralysis.
From there we’d talk about how important it is to concentrate on one part of the process at a time. I’d tout this as a matter of pure practicality: “How to write something good while not driving yourself crazy and still having time to eat and pee.”
Of course, one of the most difficult parts of the writing process is ex nihilo composition. Conquering the blank page, or the blank screen. For that reason, it’s one of the most important parts of the process to take by itself–to leave behind all other considerations and concentrate, single-mindedly, on conjuring those words from thin air. Once those initial words are there–even if they’re not much good at that point–then one can move to the (cognitively very different) processes of improving them, saying what you want to say more clearly. Processes like revision, editing, proofreading, formatting documentation, etc.
Writing in a digital world often adds two more complications. For one, since we tend to handle those later processes using digital tools, it’s often convenient to generate machine-readable text from the get-go. For another, the very computers on which we create such text are very good at introducing their own brand of distractions, from annoying pop-up advertising to the temptations of the web browser and social media. Even more insidiously, there is the temptation to edit oneself as one composes, which is often encouraged by the editing- and formatting-focused nature of popular word processing software like Word, Google Docs, LibreOffice, or Pages.
Consequently, there’s something to be said for a digital tool that makes it easier to create that single-minded focus on composition while eliminating at least as much digital distraction as possible.
In my last blog post, I highlighted a new series of commercially made devices designed to fit that very niche. While those devices do fit the bill, they’re intentionally designed to be “luxury” items–very high-quality devices made in relatively small quantities for a very niche market. All of which is just another way of saying hella expensive! This is not a criticism of Astrohaus, the manufacturer, of course. If you like those devices and can afford one, there’s no reason not to spring for one.
At the same time, the high cost makes such devices inaccessible to many writers who might benefit from one, so I’ve been asking myself whether it might be possible to create a device with at least very similar functionality at a much lower cost.
One of my solutions, which I’ll describe here, has been to repurpose an old, unused laptop into a composition-focused writing device. I think I’ve been able to reproduce much of the functionality of the expensive Freewrite at no immediate cost.
Requirements for the Device
I set out to create a device with the following characteristics:
- The device should boot directly into an interface geared toward composition. Turn it on and start writing.
- The writing interface should be bare-bones, encouraging pure composition and discouraging the impulse to self-edit. Only the most basic formatting functions should be readily accessible (bold, italic, ordered and unordered lists, headings).
- The device should contain no apps other than those that (mostly invisibly) support the writing interface. No browsers or applications with non-writing purposes.
- While no browsers, etc. should be present, the device should maintain sufficient internet connectivity to transfer files from the device to the cloud or other external storage.
- As much as possible, the processes in #4 should be automated, so the writer doesn’t have to think about anything but composition while using the device, but can then readily pick up the composed content later to revise, edit, etc. on another device.
- The interface should be as eye-friendly as possible to promote calm focus and prevent eyestrain, insofar as this is possible with a backlit (rather than e-ink) screen.
- Bluetooth connectivity should be present so one can use peripherals like a high-quality mechanical keyboard.
What I Used
In my case, the device I chose for this project is an AsusT100TA. These were originally introduced in 2015 and were touted as “ultraportable” convertible laptops (the screen and keyboard dock detach so the device can function as a touchscreen tablet). They were shipped with Windows 8, and designed not to be powerhouses, but to run basic productivity software with maximum battery life (the manufacturer advertised 11 hours). I chose this device for a few reasons:
- I had it lying around! While I had updated the machine to run Windows 10, it ran slow as molasses on the T100. Often, security updates failed because the device, even with minimal software installed, didn’t have enough storage even to download the update files. So it sat on a shelf, unused.
- While slow (under Windows 10), the machine has rock-solid build quality. It’s stood up to a lot of punishment over the years and is still in perfect shape, mechanically and electronically speaking. And, though it no longer lasts a full 11 hours, the time I get out of the original battery is still quite respectable (more like six hours).
- It has the best-feeling keyboard I’ve ever used on a smaller laptop. Not quite as nice as a high-quality mechanical, but it feels good enough to make the typing experience very pleasant (at least to me).
All these qualities made the T100 seem a good candidate, and it cost no more than what I shelled out for the (refurbished) device a decade ago, which, even then, was less than $200. A similar set of modifications could be made on almost any older laptop that one might have lying around.
What I Did
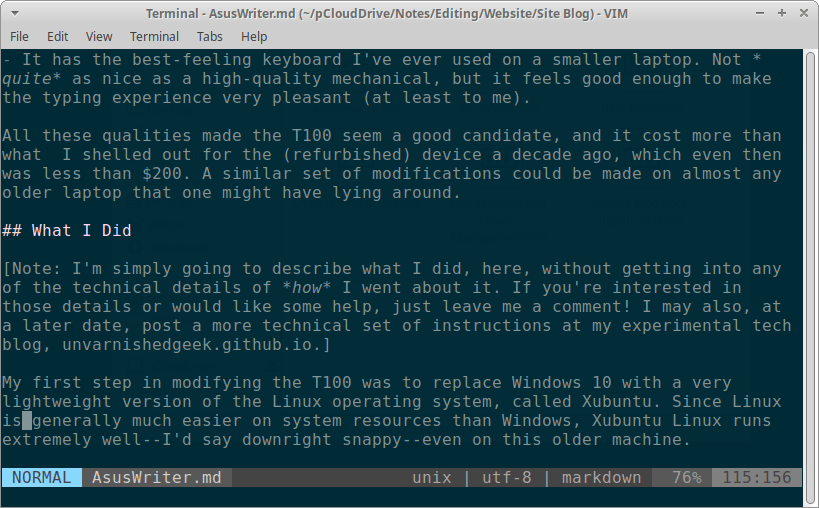
[Note: I’m simply going to describe what I did, here, without getting into any of the technical details of how I went about it. If you’re interested in those details or would like some help, just leave me a comment! I may also, at a later date, post a more technical set of instructions at my experimental tech blog, unvarnishedgeek.github.io.]
My first step in modifying the T100 was to replace Windows 10 with a very lightweight version of the Linux operating system, called Xubuntu. Since Linux is generally much easier on system resources than Windows, Xubuntu Linux runs extremely well–I’d say downright snappy–even on this older machine.

I also made several modifications to the original installation:
- Removed all nonessential or potentially distracting software, such as Libreoffice, any web browsers (Firefox and Chrome in this case), and other nonessentials like games, email clients, etc.
- Replaced the desktop environment that Xubuntu installs, called XFCE, with a window manager called i3. i3 is even lighter-weight and even more bare-bones than XFCE, making the machine run faster and further minimizing distractions.
- Made sure wifi and bluetooth connectivity were working.
- Added a few applications and tools, including my writing tool of choice, called Vim (more on this below), and some tools to help with things like transferring files over a network.
Here’s what I did in terms of each of the functionality criteria I listed above:
- Booting directly into the writing environment: I chose to take a slightly more indirect route with this. In my setup, the machine boots to a login screen that requires a password (I added this for security reasons). Once one enters the password, the computer goes straight to the window manager where a single key combination (Win+Enter) pulls up my full-screen writing interface.
- Bare-bones writing interface: To achieve this, I used a program called Vim, which is more widely known as a long-standing code editor for programmers. However, I’ve found that, with the addition of a few plugins, Vim makes an excellent, no-frills tool for composition (I may write a future post just about writing in Vim). The drawback of Vim, for some, is that there’s a bit of a learning curve involved if you haven’t used it before. What I’ve found for myself is that once I got comfy with Vim’s keyboard-based commands, it sped up my composition considerably, so it’s been my editor of choice for a long time. One of the plugins I’ve installed in Vim is one that allows it to use Markdown syntax, which is a very simple set of conventions that allow you to include basic formatting, such as boldface and italic texts, ordered and unordered lists, headings, etc. You can find more information on Markdown here. If you’d rather not mess around with a command-line tool like Vim, I recommend Focuswriter, which is a graphical app still geared toward distraction-free composition, and very customizable in terms of look and feel. It is a free and open-sourced program available on all major platforms.
- Nothing but writing apps. Vim is literally the only writing tool installed on the machine. As I’ve mentioned, there are a few other “helper” tools present in the background, but the only app one interacts with is the editor.
- Maintain internet connectivity for file transfers. I’ve set the machine to automatically connect to my wifi network on startup. Without any other apps or browsers running, there are no pop-ups or distractions despite the consistent internet connection.
- Automated File Transfer: I haven’t quite figured out full automation for file transfers yet, but, as a workaround until I figure that out, I’ve made it as easy as possible. Basically, when one is done with a writing session, one simply exits the editor and then just hits the “s” key and then Enter. The system prompts for a password, and then all files are backed up to secure storage on my personal server. There are ways to automate this more fully, which I’ll implement in the future.
- An Eye-Friendly Screen: To accomplish this, I applied what’s known as the “Solarized” color scheme to my terminal app. The Solarized color scheme was developed for Vim by a programmer named Ethan Schoonover. It uses a combination of muted blues and grays to keep the contrast level easy on the eyes without making text less readable. The terminal app that’s installed with Xubuntu allows one to select this color scheme in its preference menu.
- Bluetooth Connectivity Enabled: I’ve kept Bluetooth turned on, and installed a few helper apps to make it easier to pair peripherals with the device. On occasion, I’ve used a Dierya mechanical keyboard, which is indeed nice, but in most cases, I find that the native keyboard on the T100 provides a perfectly comfortable and pleasant typing experience.
That’s it! I’ve already done a lot of composing on this device (including this blog post), and have found that it has, indeed, helped me become more productive in my writing. My per-day word count has definitely increased, and it’s been a pleasure to work on.
An Even Easier Option with Windows
Let’s say, however, that you’d like this kind of functionality but aren’t a particularly techy person, and don’t want to mess around with something scary like Linux. You can still make some modifications to Windows to make it more composition-friendly. Depending on the machine you use, it may not run as fast as the above Linux-based option, and there will still be more unavoidable annoyances with Windows (such as automated updates). So it might not be quite as elegant or purpose-dedicated as the Linux version, but it should still help you focus on composition, while requiring less technical knowledge and fiddling to set up:
- From the start menu, go to “settings” and then “apps,” and uninstall any apps that don’t directly relate to composition. Uninstall any “office” apps such as Office 365 or Libreoffice. Uninstall any games. Uninstall Edge and any other browser software. Uninstall any social media or communication-related apps such as Facebook Messenger, any email clients, etc. Basically, if it produces pop-ups or tempts you to interface with social media or anything on the internet that’s not your cloud storage, ditch it.
- Install a text editor that’s made to help you focus on composition. Again, I recommend Focuswriter. Experiment with the settings in Focuswriter to create an overall look and color scheme that is both appealing and feels easy on your eyes (there are several built-in themes, and you can create your own).
- Install a cloud storage service like Dropbox or Pcloud. Create folders within Dropbox (or whatever you use) for all your writing. This will automatically sync your files to the cloud and allow you to access them on another computer for revision, editing, etc.
- Declutter the Windows desktop. Lots of folks keep many files and shortcut icons on the desktop. Ditch all of these (except the icon for your chosen text editor) by selecting them and dragging them onto the “trash” icon. Then, right-click the trash icon and select “empty trash” to permanently delete those files. I think it’s also a good idea to select a soothing, neutral wallpaper.
- Using Windows Explorer (the file manager), go through your Documents, Downloads, and any other folders that contain personal files. If you find any files you want to keep, transfer them to a USB stick. Then, delete all non-writing-related files you find.
- Check what services are running in the background. Often several programs and services set themselves up upon installation to run automatically on startup. These take up precious system resources, and most of them will be things you don’t need for this device. To check to see what’s running on startup, go to the Start menu, click Settings, then Apps. Then select “Startup” from the menu on the left-hand side. You’ll see a list of all the programs that are set to run on startup. For example, OneNote, Word, a messaging client, and other tools might be set to run that way, and you won’t need them! Simply un-check all of the apps you don’t want to run on startup anymore. (Note: if you installed a cloud service like Dropbox to sync your files, be sure not to disable it!)
Taking those steps should leave you with a Windows machine that is, if not an entirely dedicated writing machine, at least more focused and friendly for pure composition.
Let Me Know How It Goes!
If you attempt any of these solutions, want any additional information or help, or have further suggestions or ideas for creating a writing-specific device, please do share your results, questions, and ideas in the comments! I’ll be fascinated to see what develops.

One thought on “Introducing the Writebox: Creating A Distraction-Free Writing Device from an Older Laptop”